
WhatsApp Integration
Connect a WhatsApp number to a Jestor table and manage all conversations — incoming and outgoing — directly inside your records.
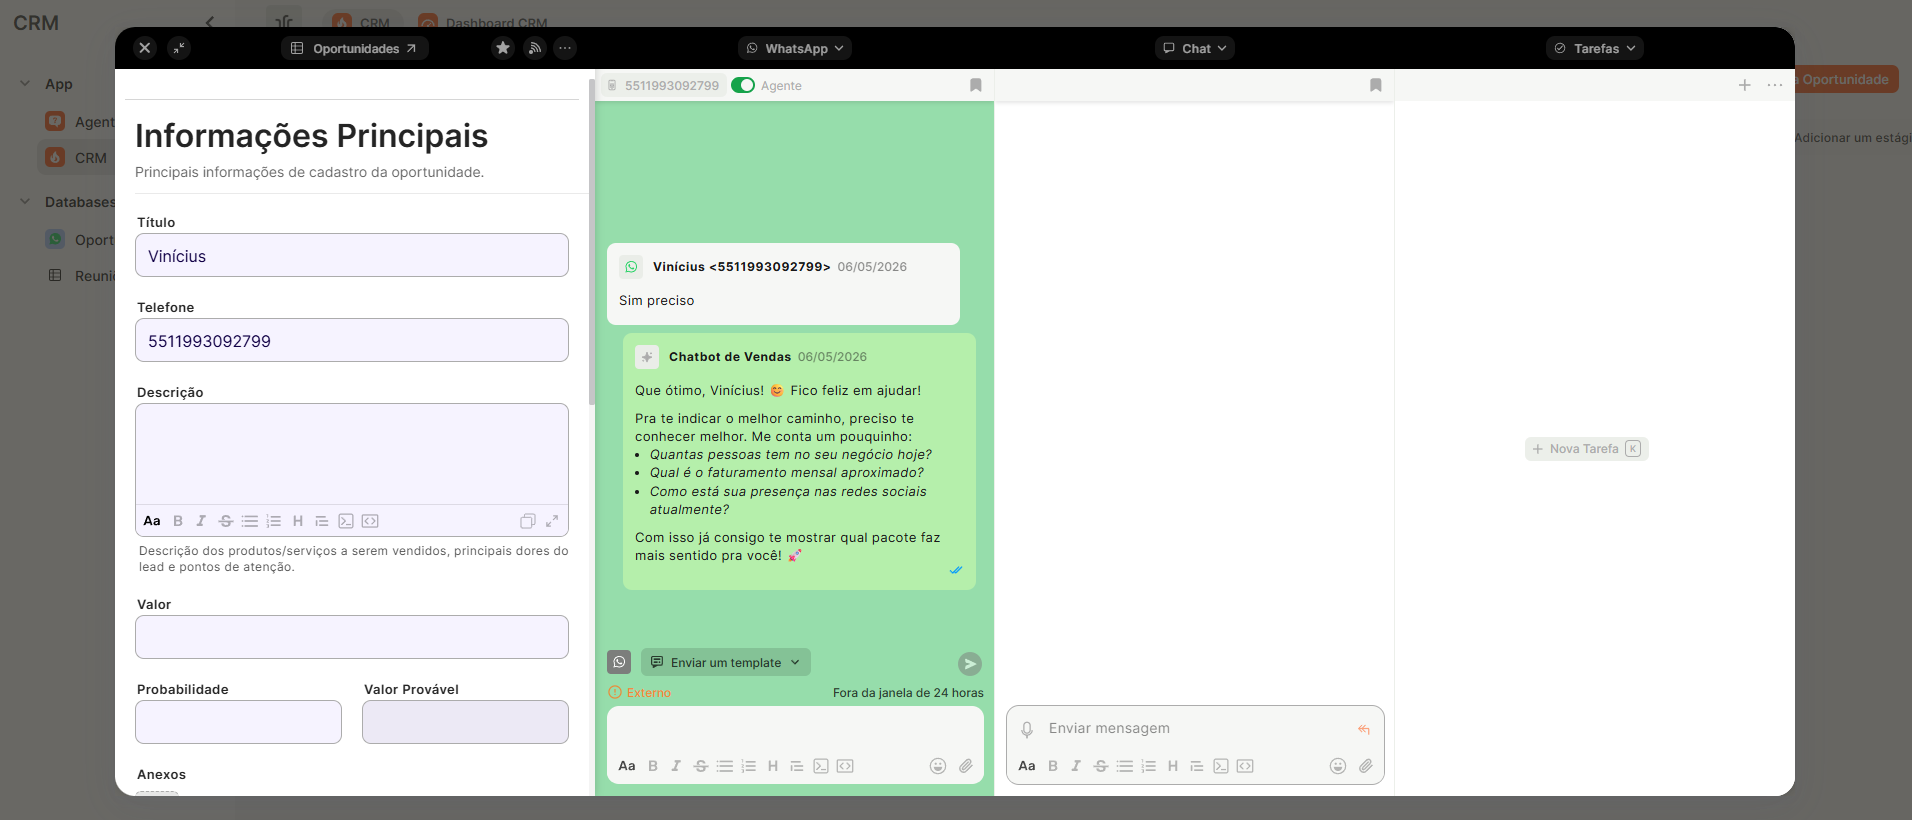
What is it
The WhatsApp integration connects a WhatsApp number to a Jestor table through Meta's official Cloud API. Once configured, every new incoming message creates a card in the connected table, and you can reply directly from inside that card. The conversation is bidirectional: messages you send from Jestor appear on the contact's WhatsApp, and messages they send appear inside Jestor in real time.
Capabilities
- Connect a WhatsApp number to a Jestor table through Meta's official Cloud API
- Automatically create a card for every new incoming conversation
- Reply to WhatsApp messages directly from inside the record, bidirectionally and in real time
- See live updates when more than one teammate is working the same conversation, with no need to refresh the page
- Send a pre-approved template directly from the message box to reopen a conversation that has been closed for more than 24 hours
- Choose which templates are available for each table/process
- Customize the chat background color for each table, to visually separate WhatsApp conversations from internal chat
- Track delivery status for each message sent (sent, delivered, read, or failed)
- Automatically receive images and documents shared by contacts into the record's Attachments field
- Keep a full history of the conversation, including attachments, linked to the record
- Centralize customer conversations inside a CRM or support pipeline, so your team doesn't need to switch between WhatsApp and your management tool
- Automatically create a record every time a new contact reaches out
- Track conversation status (new, in progress, closed) alongside the rest of your process data
- Send automated messages using pre-approved templates — for example, confirmations, follow-ups, or status updates
- Keep a full history of attachments (images, documents) shared during a conversation linked to the record
- Use different chat colors per table so agents can tell WhatsApp conversations apart from internal chats at a glance
What you need before starting
- A Jestor account with permission to manage integrations
- A WhatsApp number — physical SIM or virtual number from a provider. A dedicated number is strongly recommended; avoid reusing a number that already has an active WhatsApp
- A Meta Business account — if you run Facebook ads or manage a business page, you likely already have one. If not, you can create one during setup
How to configure
Step 1
Get a WhatsApp number:
If you already have a number, skip to Step 2.
Go to your virtual number provider account and acquire a new line. Select the option for Virtual Number for the Official API, this type is built specifically for API integrations.
After the number is created, select Configure WhatsApp → Cloud API. Copy the number displayed on screen. The provider will wait to receive a verification SMS from Meta.
Step 2
Add the number to Jestor:
In your Jestor account, navigate to WhatsApp and click New number → Connect with Facebook.
A Meta authentication window will open.
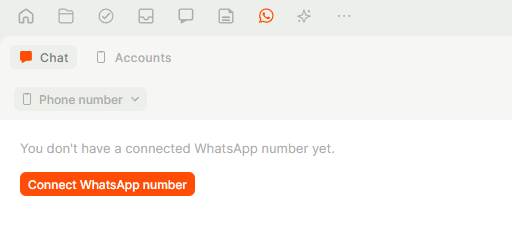
Follow the steps below inside that window:
- Select a Business Portfolio, choose your existing Meta Business account. If you don't have one, you can create one here.
- Select or create a WhatsApp Business account, pick an existing account or click Create a WhatsApp account.
- Add the phone number, select Add a new WhatsApp number, choose your country, and paste the number from Step 1.
- Confirm the display name, this is what contacts will see. Display name changes go through a Meta approval period
- Verify the number, choose SMS as the verification method. Go back to your provider account, wait for the code to arrive (usually under a minute), and enter it in the Meta window.
- Confirm the integration: Meta will ask for a final confirmation to connect the number to Jestor. Confirm.
Step 3
Add a payment method (recommended):
After the window closes, Jestor will prompt you to add a payment method.
This step is optional, but without it you won't be able to send automated messages using templates. Manual conversations will still work, you can receive and reply to messages normally.
Step 4
Connect the number to a table:
The WhatsApp number must be linked to a specific Jestor table, this is where conversation cards will be created.
Prepare the table: Create (or open) the table you want to use
Make sure the table has at least these four fields: a Title field (default text) to store the contact's name, a Phone field for the WhatsApp number, an Attachments field to receive files and images shared during the conversation, and a Status field (single select) to track the conversation stage.
For the Status field, create for example, this four options: New conversation, In progress, Closed, and Archived (names are flexible, what matters is defining which ones mark a conversation as new or finished).
Activate WhatsApp for the table: Inside the table settings, click WhatsApp and toggle the integration on.
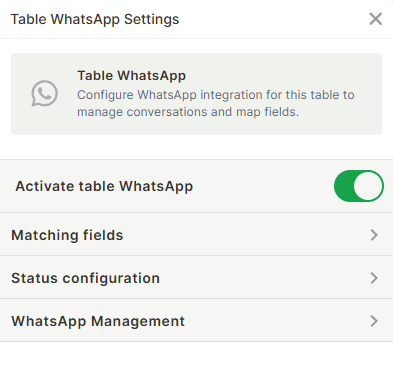
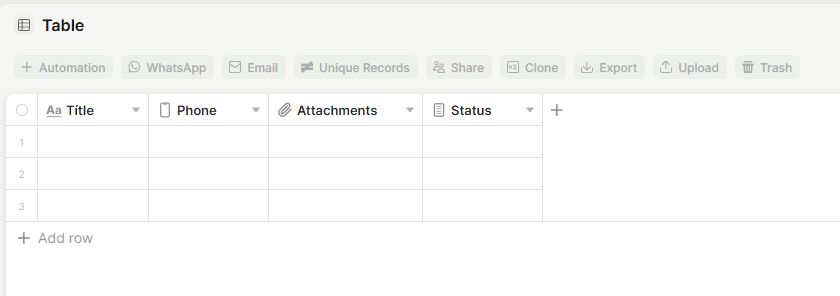
Step 5
Map the fields:
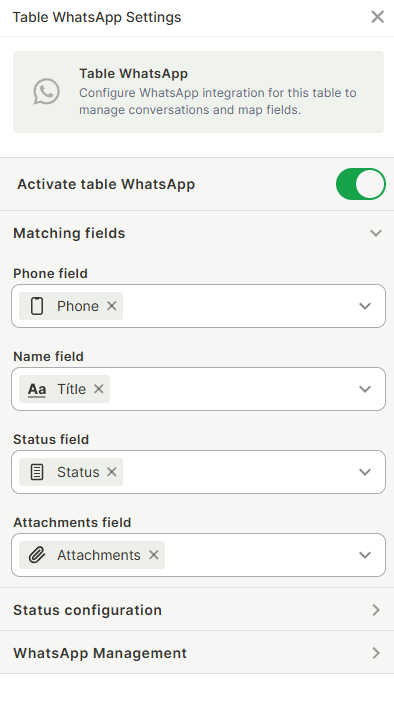
Connect each piece of incoming data to the right field in your table:
- Phone → Phone field
- Contact name → Title field
- Status → Status field
- Attachments → Attachments field
Step 6
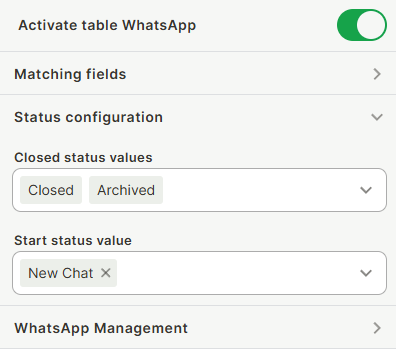
Configure status rules:
Define which status means a conversation is open and which mean it is closed. This controls re-engagement: if a contact messages again and their card is closed, Jestor creates a new card instead of adding to the old one.
Step 7 (optional)
Choose templates and customize the chat color
Inside the table's WhatsApp edit screen:
- Templates: select which templates should be available in that table's conversations. Only the templates you select here can be sent from that process.
- Costumize chat color: pick a background color for the chat inside this table (blue, purple, light green, or any option available), so it's easy to tell this conversation apart from internal chat. This is purely visual and doesn't require any change to your account or your WhatsApp number.
Select the connected number:
Under WhatsApp management, choose the number you connected in Step 2.
Click Save. The integration is now active.
How it works in practice
Once the integration is active, every new incoming message from a contact creates a card in the connected table. Opening that card shows the full conversation thread. You can type and send replies directly from inside the card — the contact receives your message on their WhatsApp.
As files and images are exchanged, they appear automatically in the Attachments field of the card.
The 24-hour messaging window
WhatsApp (Meta) only allows free-form replies for 24 hours after a contact's last message. This is a rule of the WhatsApp Business Platform itself, it applies to any tool connecting through the official Cloud API, not something Jestor controls or can bypass.
While the window is open, you can send any regular message from the card. Once 24 hours pass without a new message from the contact, the window closes and the only way to reach out again is with a pre-approved template. As soon as the contact replies, the window reopens and free-form messages work again.
Message templates
Templates are pre-approved message structures required by Meta for outbound messages sent outside the 24-hour service window.
Create and manage templates in Settings → WhatsApp → Templates. Choose the type (marketing, authentication, utility), write the content, and submit for Meta approval. Approved templates can be used in automations
Chat color customization
Each table connected to WhatsApp can have its own chat background color. It's purely visual, applies only inside that table's cards, and doesn't require any change to your account or WhatsApp number. It's useful for telling WhatsApp conversations apart from internal chat, or for distinguishing between different WhatsApp processes at a glance. Configure it in the table's WhatsApp edit screen, under Personalização (Step 7).
Sending images and documents
You can send and receive images and documents directly inside the conversation. These follow the limits set by WhatsApp's official Cloud API:
| Type | Extensions | Max size |
|---|---|---|
| Image | .jpeg, .png | 5 MB |
| Document | .txt, .xls, .xlsx, .doc, .docx, .ppt, .pptx, .pdf | 100 MB |
Files outside these formats or size limits can't be sent or received through the integration.
Native automations
Besides replying manually from the card, you can send WhatsApp messages from automations. Available actions include:
- Send a message via WhatsApp using a template
- Send a message on WhatsApp with a template via Jestor
- Send WhatsApp messages via Twilio
- Send a file on WhatsApp via uazapiGO
- Send a text message on WhatsApp via uazapiGO
- Send a file on WhatsApp via Zenvia
- Send a message on WhatsApp via Zenvia
- Send an attachment on WhatsApp via Suri
- Send a message on WhatsApp via Suri
Keep in mind
- One WhatsApp number can only be connected to one table. Need multiple processes? Use separate numbers.
- Automated messages require a payment method in Meta and a pre-approved template.
- Display name changes for the WhatsApp Business account go through a Meta review period and are not instant.
- If your Meta Business account or number was just created, Meta may take a few hours to fully activate the connection. This is expected — wait and test again before contacting support.
- The chat color customization changes only the background of the conversation inside the card; it does not change any other part of the record or table.
- Sending a template from a closed conversation does not create a new card — it continues the same conversation thread, as long as the card's status still counts as open per your status rules.
- When multiple images or documents are sent together, only the first image keeps the caption text. The rest are delivered as individual messages, not grouped into one.
FAQ
1 - Why I can't acess this feature?
Whatsapp Integration is currently in beta, only available in Jestor accounts that are in fun mode.
2 — Can I use an unofficial WhatsApp connection?
The official API (used by this integration) is authorized by Meta. It is stable, compliant with WhatsApp's terms of service, and supports templates and automations. Unofficial integrations use workarounds not approved by Meta — they tend to be unstable, risk account bans, and do not support the full feature set. Jestor only supports the official Cloud API.
3 — Can more than one team member reply to the same conversation?
Yes. Any Jestor user with access to the card can see and reply to the conversation. The contact sees one unified thread from the connected WhatsApp number.
4 — Why am I not being charged through Jestor for WhatsApp messages?
The message usage charge comes directly from Meta, not from Jestor. You register a payment method in your Meta Business account, and Meta bills you according to their pricing table for automated messages. Jestor does not add a fee on top of this.
5 — I completed all the steps but messages are not coming through. What should I check?
Confirm the number is listed and marked as active in Settings → WhatsApp. If your Meta account or number was created recently, wait a few hours — Meta has an activation window for new accounts. If it still doesn't work, contact Jestor support with your number and Meta Business account details.
6 — Do I need a brand-new WhatsApp number, or can I use my existing business number?
You can use an existing number, but it must be migrated to the WhatsApp' API, which removes it from the regular WhatsApp or WhatsApp Business app on your phone. For this reason, using a dedicated number is strongly recommended so your personal or team communication is not affected.
7-Can I send a template without leaving the conversation card?
Yes. When a conversation window is closed, the message box shows this and lets you pick from the templates enabled for that table, and send it directly from there.
8-Can I use a different chat color for each table?
Yes. Each table's WhatsApp settings has its own color option, so different processes can have different chat colors.
9-Why did the images I sent together arrive as separate messages instead of one?
This is expected behavior. When multiple images or documents are sent in the same message, only the first image carries the caption text, and each additional file is delivered as its own message rather than grouped together.
10-How do I know if a message I sent was actually delivered or read?
Each sent message shows a status indicator: sent, delivered, read, or failed. If a message fails, the error is shown next to it in the conversation.
Updated 3 months ago